【RuoYi-SpringBoot3-Pro】:部署,怎么简单效率怎么玩
本文介绍了如何一人简单高效的部署系统,如果你习惯了在公司的 CI/CD 流程,觉得本文太 LOW,那么你是对的 😜
后端打包部署
RuoYi-SpringBoot3-Pro[1] 默认集成了 wagon-maven-plugin 插件实现 FTP/SFTP 上传,在 pom.xml 根据实际需求修改配置:
              <plugin>
                <groupId>org.codehaus.mojo</groupId>
                <artifactId>wagon-maven-plugin</artifactId>
                <version>2.0.2</version>
                <configuration>
                    <serverId>RuoyiSpringBoot3</serverId>
                    <fromFile>ruoyi-admin/target/RuoyiSpringBoot3.jar</fromFile>
                    <toFile>RuoyiSpringBoot3.jar</toFile>
<!--                    <fromDir>target</fromDir>-->
<!--                    <includes>*.jar,*.war</includes>-->
<!--                    <toDir>/</toDir>-->
                    <url>ftp://ip:21</url>
<!--                    <url>sftp://ip</url>-->
                </configuration>
                <executions>
                    <execution>
                        <id>upload-jar-to-ftp</id>
                        <phase>deploy</phase>
                        <goals>
                            <goal>upload-single</goal>
                        </goals>
                    </execution>
                </executions>
                <dependencies>
                    <dependency>
                        <groupId>org.apache.maven.wagon</groupId>
                        <artifactId>wagon-ftp</artifactId>
                        <version>3.5.3</version>
<!--                        <groupId>org.apache.maven.wagon</groupId>-->
<!--                        <artifactId>wagon-ssh</artifactId>-->
<!--                        <version>3.5.3</version>-->
                    </dependency>
                </dependencies>
            </plugin>
使用前需要先配置 FTP 账号密码:
打开 ~/.m2/settings.xml(对于 Linux/MacOS)或 C:\Users\<YourUsername>\.m2\settings.xml(对于 Windows)
<settings>
...
<servers>
<server>
<id>serverId</id> <!-- 必须与 pom.xml 中 serverId 匹配 -->
<username>yourUsername</username>
<password>yourPassword</password>
</server>
</servers>
...
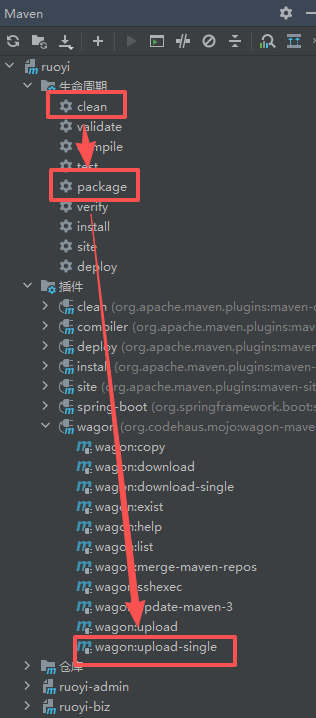
</settings>上述配置完成后,打包上传:
前端打包部署
RuoYi-SpringBoot3-ElementPlus[2] 也内置了 FTP/SFTP 上传,配置文件在 ./ftp 目录下
方式一:FTP
使用 ftp-deploy 进行部署,配置文件 ftp.js 如下:
  const config = {
  user: "", // FTP 用户名
  password: "", // FTP 密码
  host: "", // FTP 主机地址
  port: 21, // FTP 端口,默认是21
  localRoot: "./dist", // 本地要上传的目录,通常为 Vite 构建输出目录
  remoteRoot: "/dist", // 远程服务器上的目标路径
  include: ["*", "**/*"], // 要包含的文件或目录模式
  exclude: [], // 要排除的文件或目录模式
  deleteRemote: false, // 是否在上传前删除远程目录中的文件
  forcePasv: false, // 强制被动模式
};
方式二:SFTP
使用 ssh2-sftp-client 进行部署,配置文件 sftp.js 如下:
  // 基本配置(可通过环境变量覆盖)
const config = {
  host: process.env.SFTP_HOST || "",
  port: Number(process.env.SFTP_PORT || 22),
  username: process.env.SFTP_USER || "",
  password: process.env.SFTP_PASSWORD || "",
  localDir: process.env.SFTP_LOCAL || path.resolve(process.cwd(), "dist"),
  remoteDir: process.env.SFTP_REMOTE || "/dist",
};
配置好后打包上传:
npm run build:prod服务器配置
服务器直接安装 宝塔
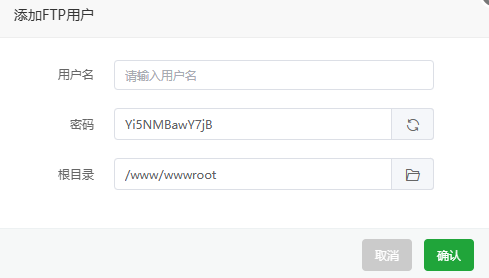
FTP
在软件商店安装 FTP服务,添加账号密码,用于上面的前后端 FTP 配置
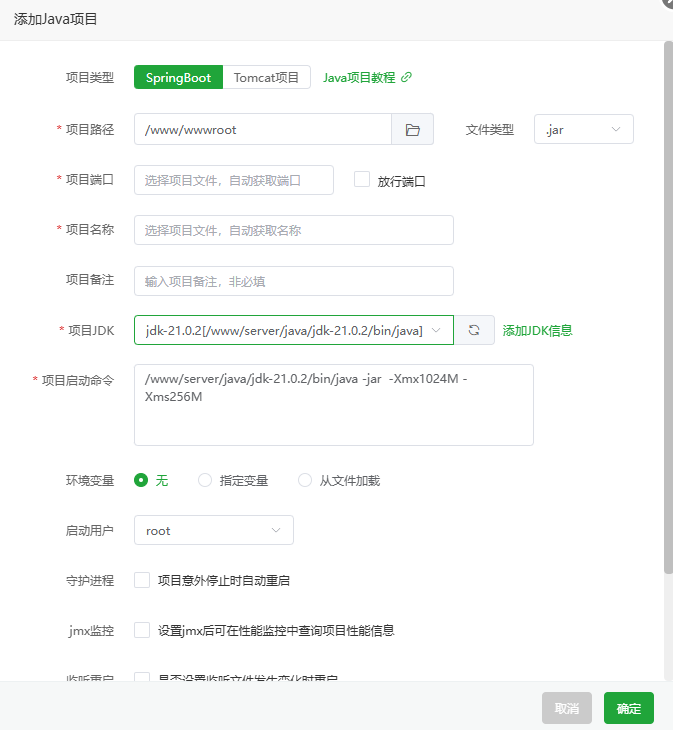
jar 部署
在网站->Java项目->添加Java项目,根据你的实际情况填写配置
Nginx 配置
  location / {
            root   /www/wwwroot/项目名称/site;
            try_files $uri $uri/ /index.html;
            index  index.html index.htm;
        }

   location ^~ /admin {
            alias   /www/wwwroot/项目名称/dist;
            try_files $uri $uri/ /admin/index.html;
            index  index.html index.htm;
        }
#location / {
#            root   /www/wwwroot/项目名称/dist;
#            try_files $uri $uri/ /index.html;
#            index  index.html index.htm;
#        }

        location /prod-api/ {
            proxy_set_header Host $http_host;
            proxy_set_header X-Real-IP $remote_addr;
            proxy_set_header REMOTE-HOST $remote_addr;
            proxy_set_header X-Forwarded-For $proxy_add_x_forwarded_for;
            proxy_pass http://localhost:项目运行端口/;
            # ai stream
            proxy_buffering off;
            proxy_cache off;
            proxy_set_header Connection '';
            proxy_http_version 1.1;
            chunked_transfer_encoding off;
        }
        error_page   500 502 503 504  /50x.html;
        location = /50x.html {
            root   html;
        }
jar 自动重启
jar 上传后还需要手动重启服务,这不符合我们的懒人形象。这里使用 PM2 监听 jar 文件变化来自动重启
pm2 start "java-service 项目名称 stop && java-service 项目名称 start" --watch "/www/wwwroot/项目名称/项目名称.jar" --no-autorestart --name 项目名称结尾
至此以后前端打包部署只需要 npm run build:prod,后端只要打包后点击 wagon-upload:single 即可!
往期教程合集
引用链接
[1] RuoYi-SpringBoot3-Pro: https://github.com/undsky/RuoYi-SpringBoot3-Pro
[2] RuoYi-SpringBoot3-ElementPlus: https://github.com/undsky/RuoYi-SpringBoot3-ElementPlus